In this short clip, we had to demonstrate several different camera angles whilst using dialogue. The cinematography we tried to incorporate were;
- High angle
- Zooming in
- Over the shoulder
- Close up
- Tracking
When creating the preliminary task, I learnt how to use a camera & tripod, as well as executing the different camera angles, which are listed above. When filming, we found some cinematography easier to produce than others;
High Angle -
 The first angle we used was a high angle. Normally this angle would be used to portray characters looking weak such as the victim, but as we didn't have a specific storyline it didn't have the same effect. This angle was reasonably easy to carry out as we filmed near some stairs, meaning the person with the camera could simply film from the top of the stairs. However, the stairs are not going to be available when filming our opening thriller clip and so this angle may be harder to carry out. We would therefore have to think about how we can use our location to our advantage to show this particular shot, such as by using hills or by using a high angle when the character is on the floor. Having completed our preliminary task, I also learnt that a tripod can be extended roughly up to 2 and a half meters long, and so we could simply extend the tripod when filming high angles, if there are no hills etc, available.
Zooming - In -
The next piece of cinematography we used was 'zooming - in' which can be seen from 0:05 to 0:15 seconds in the preliminary task video above. This shot is used to draw in the audiences attention and to help them connect to the characters. We incorporated this shot to do just this; we wanted our viewers attention to be on us so they would feel more engaged and interested in the conversation we were having, as well as showing our knowledge of how to carry out this shot.
I found this shot hard to carry out as the zoom button on our camera was broken, and so meant we couldn't zoom in or out with the ease of a button. To overcome this we decided that the group member that was filming had to quietly walk forward to make it look like we were zooming in, which is why when watching our preliminary task, it looks like a handheld piece of footage, as we couldn't use the tripod. This is something that can be easily fixed by using another camera, which should make filming easier for the actual footage. Although this handheld footage was a mistake, it also gave my group some experience with holding the camera whilst filming, which is good as this is a shot we wanted to use in our thriller opening sequence due to it being conventional to thrillers.
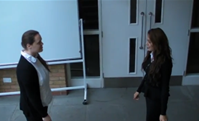
 Over the shoulder shot -
  We used this shot to show our reactions to what the other person was saying to help the conversation flow more easily. It also helped us to flow into the close-up of the girls face. I found this shot simple to complete but very time consuming as we had to film over my group members shoulder looking at me, then stop filming, move the camera and tripod onto the other side and re-film over my shoulder. This helped me because it meant when planning our filming schedule, we can estimate more accurately the time it will take for each shot to take place, which will mean we can keep to our plan.
 Close-up -
 We chose to include a close-up in our preliminary task as it is conventional to the thriller genre as it helps to clearly portray the emotions on the characters faces. We therefore thought we would be likely to use this shot in our clip and so wanted to practise creating it. This again was simple to do, but due to the lack of a zoom button we had to pause filming and move the tripod closer to the persons face to see the close-up. This when put with the other footage looked 'jumpy' which although can be effective in a thriller film, was not what we were aiming to do.
Tracking -
The next piece of cinematography we used was 'tracking' which can be seen from 0:33 - 0:40 seconds in the preliminary task clip above. We used this shot to show the girl walking away from me and the camera and out of the door to end the short clip. This shot should show the camera moving smoothly, following the girl who is in constant focus. This shot was reasonably ok to film as the handle on the tripod made it easier to carry out. Due to how simple this shot was to complete, my group and I decided that it we could use 'tracking' in our thriller opening for when the little sister is walking through the forest alone, as this would allow us to vary the shots used and make it more interesting for the viewers.
Another part we struggled on during the preliminary task was deciding on what to say during the conversation that was being filmed. We wasted quite a lot of time on this which effected how long we had to edit the footage in class. In the end, we decided it didn't matter what was being said as the task was to show our understanding of cinematography, and so we roughly planned what camera angles we wanted to use and then she filmed us having a normal conversation.
If we had come up with a simple story line then this would have helped us in choosing the appropriate cinematography and setting to use, which would have made an even bigger effect, which would show our understanding even further. This has made me realise how important and essential the planning stages of my thriller opening clip will be, and to make sure I plan in lots of detail.
When editing the footage for my preliminary task, I used the 'Final Cut Pro X' software. When using this software for the first time, I learnt how to upload my footage either from a folder on the computer or straight from the connected camera. I could then preview all of the clips we had filmed and select and use the best ones, by dragging them onto the time line below. I also learnt how to 'trim' the footage to cut any unwanted parts. I done this by selecting the specific footage that needed to be trimmed and then clicking at the end of the clip, and moved the arrows to get rid of the unwanted footage. For example, when watching back the footage for the preliminary task, I noticed that I nodded as if to say start now, and the end of this nod was caught on camera. This was not meant to happen and so I needed to get rid of it.
The preliminary task will assist me when planning and creating my own thriller film as it told me what not to do. Firstly, we took too long filming a short amount of footage, and so we did not have enough time to edit the footage in class. Consequently, we had to come back in our free time to edit the footage. This was helpful as it told me that we need to ensure we plan everything carefully and in detail to make sure we can film and edit everything within the deadline.
It also gave us some experience as to using the camera and using the editing software and so when making our thriller clip, it will not be as foreign to us as it was when making the preliminary task.
I have gained an understanding of the types of cinematography that worked well and what did not; such as the tracking was good and so I will be using this in my thriller clip. One thing I did learn from making this preliminary task was to ensure we plan what edits we want to use and why, instead of guessing and making it up at the editing stage. This should help to base the edits around the footage so that it flows.
You have made a start in explaining what the purpose of your preliminary task was. You have started to consider some of your strengths and weaknesses, but these points needs to be developed in a lot more detail. This will enable you to demonstrate further understanding of this task.
ReplyDeleteAim to include further detail on the editing software that you used and how your preliminary task, will assist you with planning your main thriller.
The points that you have included above, helps to show further understanding of what your preliminary task was. This is evident through the examples that you have explored in more detail above.
ReplyDeleteAim to focus more on your main task and consider how this preliminary task, will assist you with planning and creating it.